It is worth noting that some of the Grub4dos commands (e.g. password, fallback, etc) are only used in configuration files – they are not relevant when using the command line. The configuration file is used to script boot options – the default menu is text based, alternatively a splash image can be used.
All commands in the configuration file must be in lower case. All boot options must begin with the command title, which should be followed with the text to be displayed in the boot menu (e.g. title Boot Windows XP will display the text “Boot Windows XP”.
Once the boot menu is displayed the selected menu option can be edited before booting (by pressing the [e] key), however the edits take place in memory and are not written to the configuration file.
Sample menu.lst file (included with Grub4dos download) -
NOTE - all lines starting with # are comments - they are not processed.
Menu colours can be set using the following command syntax (See also APPENDIX - Commands section here). Default is white text on a black background, with current option being black text within a white highlight -
NORMAL HIGHLIGHT HELPTEXT HEADING parameters use the format f/g, where f=foreground colour and b=background colour. Colours must be one of the following - black, blue, green, cyan, red, magenta, brown, light-gray, dark-gray, light-blue, light-green, light-cyan, light-red, light-magenta, yellow and white.
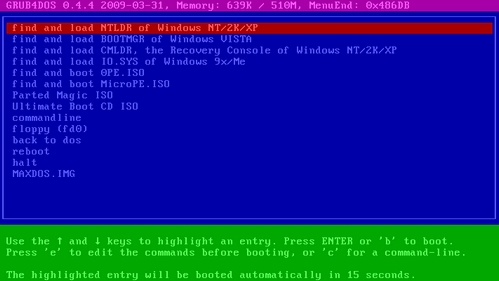
The easiest way to demonstrate the syntax is to use a screenshot. The following menu.lst entry color light-blue/blue light-red/red light-green/green light-magenta/magenta will display all menu entries with light blue text on a blue background (NORMAL) with the selected option being in light red text within a red highlight (HIGHLIGHT). The HELPTEXT section (below the boot menu) will use light-green text on a green background and the HEADING will use light-magenta text on a magenta background (see figure 1. below) -
It is also possible to use a background image with a menu, using either the splashimage command or the gfxmenu package. Both of these options must be used in a configuration file and cannot be used from a command line. gfxmenu requires external files/packages and is much more complex than using the splashimage command, however it does support .jpg images. For gfxmenu usage, see here.
If using the splashimage command, the image will need to be in the .xpm format (which can be compressed with gzip) and must be 640x480 pixels with a maximum of 14 colours. For instructions on creating a splash image see next section (here). To display splash image splash.xpm.gz (in current root directory) the following entry should be used in menu.lst -
To display splash image splash.xpm.gz (saved in 1st partition on 1st hard disk drive) the following entry should be used -
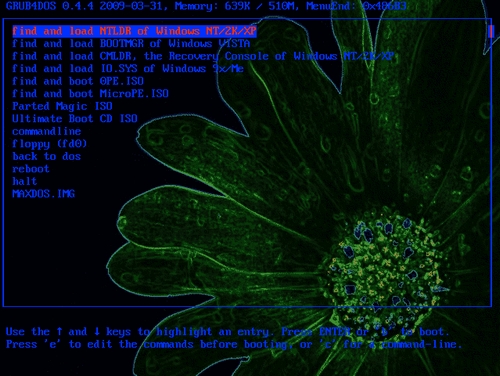
By default the foreground colour (all of the menu text and the highlight for the currently selected option) will be white and the background colour (the highlighted text within the currently selected option) will be black. To change these colours use the following menu.lst entry -
Where RR is red, GG is green, and BB blue. Numbers must be in hexadecimal. In the following example the menu text and highlight for the selected option will be displayed in Blue (hex decimal value 0033FF) and the selected option will have Red (hex decimal value FF3300) text – refer to figure 2. below.
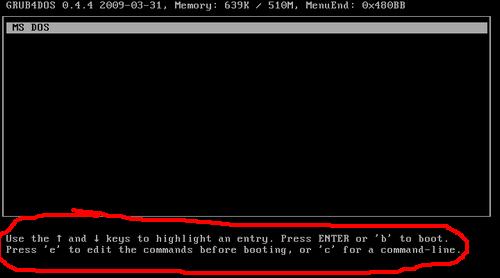
Grub4dos will display the following message beneath any available menu options -
It is possible to replace the above text with a user defined entry specific to individual menu items. Any message must be appended to the title line of the menu entry. Text to add should be preceeded by \n. As an example, the following menu.lst entry -
Will display the menu in figure 3. -
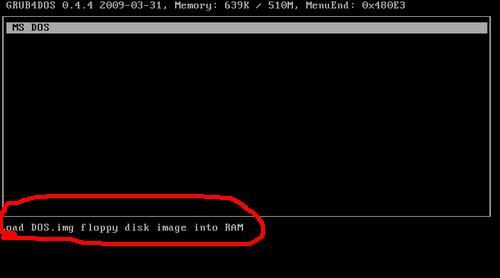
To add the message "Load DOS.img floppy disk image into RAM" to the menu.lst entry for title MS DOS - edit the entry, changing title MS DOS to title MS DOS\nLoad DOS.img floppy disk image into RAM. The new menu.lst entry -
Will display the menu in figure 4. -
Multiple lines can be added to the message by adding additional \n (new line) entries/commands. E.g. title MS DOS\nLoad DOS.img floppy disk image into RAM\nMount as (fd0) and boot from the image Will display the following text/message at the bottom of the menu screen -
Other commands can be used for the displayed message/text. The following is from README_GRUB4DOS.txt -
It is possible to specify a default boot option by using the default command. If the timeout command is also specified, the system will wait for the set timeout period before booting the default entry.
To set a 10 second timeout use following entry -
To set a default entry (to be booted after timeout period has completed) use following entry (default 0=first menu item, default 1=second menu item, etc.) -
It is possible to change the default entry to the last option selected when Grub4dos was previously booted by using the default command followed by a file. E.g. -
The command default (hd0,0)/default specifies that an entry be written to the file default, on the first partition of the first hard disk (this file must be copied from the Grub4dos download – do not edit the file as it must remain 2048 bytes in size). If using this option, the drive containing the default file must be writable. The menu entry must also include the command savedefault – e.g.
To restrict access to the command line interface use the command password prior to any menu entries – e.g.
When booting Grub4dos with a password protected configuration file the default instructions will change from -
to -
The user enters the [p] key to gain privileged control, followed by the specified password – which in the preceding example is administrator.
It is possible to use an encrypted password by using the command password --md5 followed by the encrypted password – in the following case “$1$ZjU0$k107noL9DOaClJEu6n6f91” is an encryption of administrator.
WARNING - do not generate your "md5 hash” password using another program as it is unlikely to be compatible with Grub4dos (see here). To ensure compatibility use the md5crypt command from within Grub4dos - see below.
To create an encrypted password, boot Grub4dos and press [c] to access a command line interface, then type the command md5crypt - this will prompt you to enter a password and will output the chosen password as an md5 hash (see figure 5. below).

It is also possible to restrict access to individual menu items when a password has been set by using the lock command, until the user enters the correct password (using [p] key to gain privileged control, followed by the password) any menu items designated with "lock" will not be accessible -
Alternatively the password command can be used to protect individual menu entries by specifying the password command within the entry – e.g.
md5 hash’s can also be used within menu entries. Different menu entries within the same configuration file can be protected with different passwords - whilst still using a password entry at the start of the configuration file forcing the user to enter a password to Press 'p' to gain privileged control - e.g.
It is possible to create sub menus by using the configfile command, followed by the filename of the configuration file you want to load. E.g. menu.lst contents –
Will load submenu.lst. The submenu.lst configuration file follows the same format as menu.lst – a new menu colour scheme can be specified, default boot entry can be set, etc. Adding an option to return to the previous menu is recommended, to avoid being "stuck" in the submenu.
The command find --set-root combined with a filename can be used to locate a marker file on a device and set that device as the root for all further commands within the menu entry (or all further commands executed from the command line). E.g. –
The example above will search all supported partitions/devices for the file hdd.tag and will set the first device it finds, containing hdd.tag, as the root device. The partition boot sector of the device (chainloader +1 = first sector of current root device) will then be chainloaded.
It is possible to locate and load operating systems in this way. If for example Windows XP is installed, the following entry could be used -
If using the above example it is assumed that the NT loader ntldr is only present on one device. If multiple devices contain ntldr, the first one found will be set as the root device. As this could lead to the wrong installation booting, searching for unique tag/marker files are preferred. Devices are searched in the order –
Please note that ntldr (and other Windows loader/system files bootmgr and io.sys) must be on a partition on device (hd0), or Windows will not boot - see here for a full explanation and workaround.
It is possible to exclude floppy devices (or cd devices) from the search by using the command --ignore-floppies (or --ignore-cd) - e.g. find --set-root --ignore-floppies /ntldr.
REMEMBER - find --set-root sometimes leads to unexpected behavior - e.g. if you have used the map command and the drive you are expecting to find the file on is no longer visible in Grub4dos. Always remember that the search stops with the first instance of the file you are scanning for. Even using marker files can result in unwanted behaviour if you had forgotten (or didn't know) that the file was on more than one device.
The operator && can be used to execute a second command if the first command is executed without error. The operator || can be used to execute a second command if executing the first command results in an error. From README_GRUB4DOS.txt -
Some pratical examples are included in grldr's embedded menu and in the sample menu.lst file included in the Grub4dos download.
The entry find --set-root --ignore-floppies --ignore-cd /menu.lst && configfile /menu.lst (from the embedded menu) will execute find --set-root --ignore-floppies --ignore-cd /menu.lst (the root of all (hd) type devices will be searched for menu.lst and the first device found containing menu.lst will be set as the root device). If this part of the command completes successfully then the command configfile /menu.lst will be executed.
The entry map /pmagic.iso (0xff) || map --mem /pmagic.iso (0xff) (from the sample menu.lst) will execute map /pmagic.iso (0xff) (mapping the cd image file pmagic.iso as the virtual device (0xff)). If this command fails (if for example the image is non-contiguous) then the second part of the command map --mem /pmagic.iso (0xff) will be executed.